Showing posts with label knots. Show all posts

Wednesday, July 25, 2007

How to Pull Cables with String

The knot to use is called a "stitch", and it is the same technique used in data centers to secure bunches of cables without all of that Velcro mess.
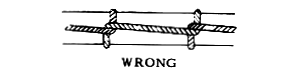
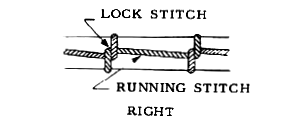
Either the "Right" or "Wrong" style will work, and I describe the "Wrong" method below. This works for Ethernet cable, Romex®, and similar cabling. It's a great technique to use with fish tape, the metallic band on a reel used to fish inside of walls.
  1. Make two loops in the string.
  2. Turn one around.
  3. Stick the cable through the loops.
  4. Pull on the string to tighten (it's OK for the loops to separate). If done properly, the harder you pull on the string, the tighter the knot gets. If done wrong ... just do it again.
  5. Wrap with as little electrical or duct tape as possible to secure the loose end of the string, protect your cable end, and to keep the end of the cable attached to the string so it doesn't wedge as you pull it. Too much tape will snag as you pull it through.

For fish tape, you typically fish the tape from where you want to go to where the cable is. Attach the string to the hole in the end of the tape. The other end of the string gets the procedure above.

Sometimes your intended run is such that you can't get yourself or the fish tape reel to the destination. If you have an open space between two holes, sometimes the fish tape flops around. In those cases, attach the string to the fish tape before fishing it through, so that you can control the tape a bit with tension on the string. You will then have string all the way through the run.

I've used this knot (doubled) for connecting two ropes, since other knots form a point of weakness and this one doesn't (when doubled). Knot the loose ends in a square knot rather than with tape.

What To Do With Old Wire and Cables

This is about copper cable, such as old 2-,4-,or even 50-pair telephone cable, cat-3 or cat-5 Ethernet cable, non-metallic electrical cables (Romex®), or anything similar. Whether you choose to reuse or recycle it, the stuff is getting too expensive just to throw away. This page describes how to use it for audio speaker wire, make rope from it, or even how to use it for some really environmentally awful fun.
  • Copper cable can be recycled, but finding a recycler nearby who deals with it may be difficult. Luckily, Earth911.org provides a recycler locater search box.
  • Use old RG58 Ethernet cables with BNC ends as speaker cables, with BNC jacks in wall plates as needed. This type of cable is designed to carry radio frequency signals, and works even better at lower audio frequencies where impedance is negligible. It's easy to use, way cheaper (if you've got it already) than doing what this guy recommends. The sound is the same.
  • Old twisted-pair (Cat-3 or Cat-5) Ethernet cable works great as a source for color-coded twist ties. Leave the vinyl jacket on until use, then strip off as much as you need. Or you can cut it all up and stand it in a jar.
  • Rope: braid a strand of copper cable with two strands of other cord, of either synthetic or natural fibers. This makes a rope that is stronger than the individual cords and that will never rust.
  • Rope 2: Braid twisted sets of copper wire with strands of cotton or synthetic string of similar thickness, again making a rope. Use as many individual strands as you want, up to a practical limit. You can make the twisted sets of copper wire by attaching one end of a set of wires to an electric drill and the other to something fixed in place. Twist one set of wires clockwise, the other counterclockwise. This can be done in stages without cutting the wires. Twist each section the same amount and as tightly as desired, but avoid knotting. Braid the three (or more) pieces of cable or cord together, taking care to balance the twisting directions (so the resulting cable will tend to kink less).
  • Romex makes a nice pipe hanger for plumbing work, since it's flexible but stays in shape. The individual strands (solid wire only) also make excellent heavy-duty twist ties.
  • PVC-coated copper makes a pretty, multicolored flame when it burns on a campfire. The smoke is toxic, of course, and so not really good for the air, but still, it's pretty.

Friday, June 15, 2007

Tying Shoelaces So They Stay Tied

The bow knot we use to tie our shoes has some good things going for it. It's easy enough to learn, it's as quick as anything else to tie, and as importantly, it's very quick to untie. The trouble is, it comes undone too easily. I use a slight variation on the bow knot, which looks like a nicely tied bow knot but never comes untied until you untie it.

Athletes, children, even business people find it important to keep their shoes tied. Whenever I see some collegiate or professional athlete calling time out so that millions of people can watch him tie his shoes, I think "There's a guy who doesn't know how to tie this shoes!" And there are few things sillier than a man in a $1000 suit walking around with laces dangling from one $200 shoe.

The usual solution, retying the loop ends, looks ugly, doesn't stay as well as it should, and worst of all makes the knot difficult to untie.

Parents and coaches everywhere need to teach their kids the following simple little method. Once it becomes a habit, it's one less worry in life, and one less thing to nag about.

The problem is the ordinary bow knot we traditionally use to tie shoes. I use a slight variation on the bow knot, which looks the same (but neater), and never comes untied. I've used this knot with leather boots, dress shoes, and shoes used in running hundreds of miles.
  1. Cross the strings over to make the usual base, cinching it as tight as desired.
  2. Make a loop with one string.
  3. Wrap the other string around that one TWICE, instead of just once.
  4. Push the remainder of the wrapping string through two wrappings.
  5. Tighten fully.

This works with any shoe lace, whether cotton, synthetic, or leather.

As I typed all of this in, I did a web search to find a picture of shoelaces. It turns out that a guy has a whole site just about shoelaces. The Green Tennis Shoes Principle striketh. His site has pictures of this method, called the Better Bow Knot.


Why does this work?


As the two loops are pulled apart during the final tightening, notice that the two center wrappings cross over one another. That forms a little sub-knot, so that in order for one wrap to slip, the other has to slip first. As a result, neither one does.

Untying is the same as with a standard bow knot. Make sure the ends aren't pulled through the loops, and pull on the loose ends.

I suspect, without any data whatsoever, that this method may even be easier to learn for first-timers. The only hard part about tying a bow knot is in the wrap-and-tuck step. Wrapping twice should make it more clear to young learner how it should be done.

Or maybe knot.